Ready to transform your backyard living space with a luxurious new pool? Extreme Pools Renovations can create a custom concrete pool for your backyard. We proudly serve Wake Forest, Chapel Hill, Cary, Durham, Apex, Raleigh, & Holly Springs, NC. We help you to create unique masterpieces for endless family fun. Escape to your backyard resort today!
All our new pool construction designs are presented in 3D (three-dimensional) so you can see what your pool is going to look like. We handle all of our permitting and engineering in-house, so we can apply for your building permit faster. During the construction of your new swimming pool, we constantly supervise the work. When you choose Extreme Pools Renovations for your pool installation in Raleigh, our in-depth process will ensure that your new pool is absolutely perfect! Check out our process below to find out how we bring your ideas to life.
With a minimum of 10 years of experience, our experienced designer will help you come up with a design concept that fits your backyard, but even more importantly what you and your family envision & need! We want our sales team to be able to tell you what can be built and designed in your backyard. Once your appointment has been set and the first visit completed, it usually takes about a week to design a rendering. This is shown to you and your family at our Design Center on a large TV screen. Also at our Design Center, you will also be able to see your different standard options that come with your pool project. So let’s set that appointment and transform your backyard!
Once you have settled on a design and the contract has been completed, the excitement of seeing your pool laid out starts to become a reality! At this time, we ask that someone is home that can make a final decision on the layout. Please note that this is the time to make any changes that you may have thought about from contract to layout.
The form and excavation crew come in and form the swimming pool layout which has been signed off on at layout. Once the forms are completed, then the excavation starts. Warning! This is the time your backyard starts to look a little different than before we started. So please! No tears allowed!
Once the excavation is completed, the steel (rebar) crew comes in and starts making the skeleton of your swimming pool shell. Notice how our spacing is 10” on center. Of course, there are exceptions when the rebar is placed closer for different applications (deeper pool, raised walls, shot retaining walls are just some examples). You will also notice plumbing (white Sch 40 PVC pipe) being installed in different areas of the pool skeleton. All main drains and hot tub plumbing will be pressurized to make sure the plumbing is holding pressure. There will be more pressure test through out the project in different stages.
Fun day! This is the day you see your pool skeleton becomes a pool shape in a matter of hours. Just (6) steps left before splash day! With the help of our expert gunite subcontractors, the steps and sitting benches are formed. How about that tanning ledge? Can you already see yourself in those 9” of water laying in those Ledge Lounges with a refreshing beverage in your hand? Too much sun? No worries! Just install your umbrella in the umbrella sleeve we provided you in your tanning ledge design. Now you can really relax knowing that you are not going to get sunburn today! How is the drink doing? I think Mom & Dad need a refill!
To most people looking at this is confusing. Our experienced plumbing crews will install your plumbing to make sure the hydraulics’ are correct and to follow the flow charts. Stabilizers are used at an end of a run to make sure all returns have equal pressure. Our pipe sizes vary. From our minimal of 2” Sch 40 PVC to 4” and above for larger projects with demand for more water flow and suction. On our construction drawings, you will be able to see the different pipe sizes we are using for your pool project. This is also an especially important step for your project. This is when we keep your plumbing lines pressured until the pool patio is completed. Then we install your pool equipment.
This is also a very important step in assuring your pool project keeps looking great for years to come! By excavating your ground, we have disturbed your soil compaction. We make sure to compact all backfill to a minimum of 95% density. It does not look good when your travertine or concrete pavers sink in areas. Since it is impossible to be 100% sure of the compaction, we give you an entire year (1) of workmanship warranty.
Preparing the waterline tile or any tile we will be using in your pool project is also important. Our crews have many years of experience in installing just Swimming Pool waterline tile. The concrete shell is washed, and a brown coat/waterproofing material is applied. Notice also, that a laser level is used to make sure each tile piece is leveled. Once the waterline tile has been installed and or other tiles, we start with the pool coping. This goes on top of the pool shell all around the perimeter. This is also a product that you choose at our Design Center. All coping & tile products are grouted to match. Then we start laying out the pool patio and again, the customer needs to sign off on the layout. We are getting closer to splash day!
This is a stage where we coordinate both our pool patio crew and our licensed electrical sub-contractor. While our pool patio crew is installing the pool patio, our electricians are connecting your pool equipment. The plumbing is tested one more time to make sure it is holding pressure. Once the Electrical is completed, our pool patio guys are finishing up at the same time.
We are now just 2 steps away from splash day! The interior prep is extremely important. This is where our crews go around the entire pool shell and clean, pressure wash, and use acid to remove grind in dirt and to remove any loose concrete pebbles. They also hydraulic cement every PVC plumbing pipe that comes into the pool shell. This helps secure no leaks. A lot of people think that concrete is waterproof. It is not! The interior plaster along with a proper hydraulic cement application makes your pool hold the water. Guess what? Just 2 more steps away!
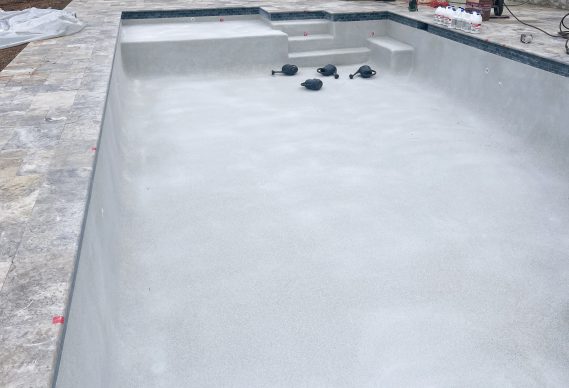
So here we are! The day most people tell me that that does not look like the color we picked! But wait, let our crew complete their work, clean the plaster, and add the water to the tile, then it will look like the color you picked! This brings a big smile to us! The smile is because we have completed your project.
So now the water is in the pool. Our startup person is there to start filtering the water and adding the proper chemicals to help cure the pool plaster interior correctly. Even though you purchased a salt-chlorine generator pool, it will be a slightly chlorine pool for the first 30 days. We need to make sure that the pool interior is curing correctly. Then we convert you to a salt Chlorine generated pool. Also, we want to clear that sometimes, there is a waiting period before using your pool. Our start-up person will let you know. One more important item. Your pool heater whether for the pool or hot tub can not be used during the 30-day maintenance period. Enjoy your time in your pool making lifetime memories and thank you again for letting Extreme Pools Renovations built your dream project!!